A Wi-Fi extender, also known as a repeater, is a device that boosts your Wi-Fi signal. It takes the signal from your main router, strengthens it, and spreads it further.
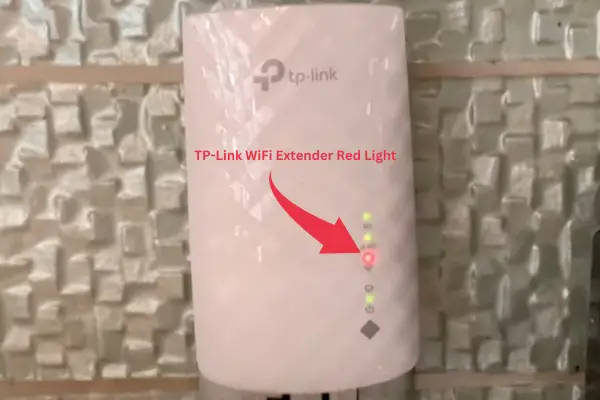
If you have a TP-Link Wi-Fi extender and it’s blinking red light, it means the Wi-Fi signal it’s receiving is too weak (less than 30%). The extender can’t properly process this weak signal, so you have no active internet connection.
If your TP-Link Wi-Fi extender is blinking red light, these could be the reasons behind it:
- Long Distance/Poor placement
- Interference from other electronic devices
- Corrupted Firmware
- Extender Settings Problem
- Problem with the main router
- TP-Link Device Failure
Before you try the fixes, I recommend you give your extender a hard reset. Make sure the extender is on and locate the small reset button. Use a paperclip or similar object to press and hold the reset button for about 10-15 seconds until the lights on the extender turn off and then on again. Let go of the button and wait for the extender to restart, which may take a few minutes. Remember that a hard reset will reset the extender to its factory settings, so you must set it up again.
Now let’s move to fixes,
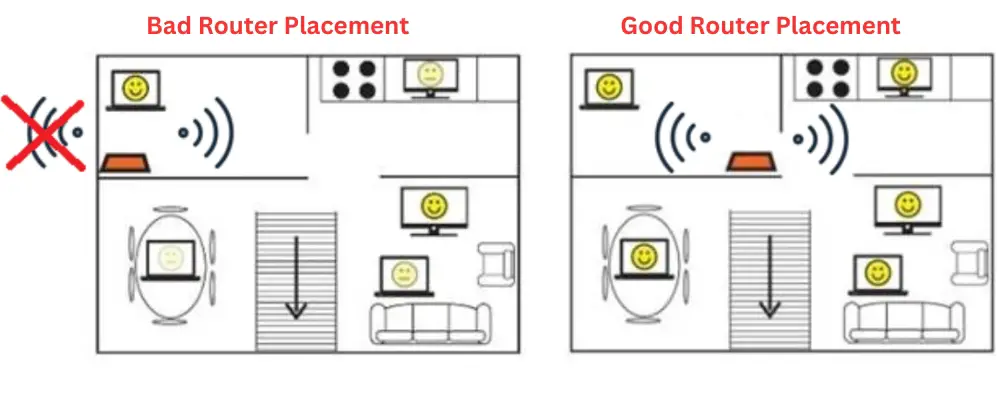
Fix 1: Place the Extender Appropriately
If you have placed your TP-Link WiFi extender too far from the main router. It might not receive more than 30% of the signal strength (that is required) to boost the signals and will blink red.
Other wrong areas where your extender will fail to receive signals are crowded small rooms, behind the furniture, outside the house and on the floor.
To solve these issues, you can try a few things.
- Move the extender closer to the router. Doing this will give the extender a stronger signal and work better.
- Place the extender at least 3 meters high, like on a shelf or table. This height helps the Wi-Fi signal travel more effectively.
- Choose a central location for the extender, such as a gallery or hallway. This way, the signal will reach different areas more easily.
- Keep the extender away from big objects like furniture or appliances because they can interfere with the Wi-Fi signal.
Fix 2: Minimize interface from Other electronic devices
Electronic devices like cordless phones, Bluetooth devices, printers or microwave ovens generate electric flux that can interfere with the Wi-Fi signal.
If this is the case, your TP-Link extender will fail to receive the required signal strength to boost the signals and will show red light.
To solve this problem, keep the extender away from such devices and turn them off when not in use to minimize interference.
Fix 3: Update the Firmware
Like other hardware companies, TP-Link continuously updates its device firmware to remove errors and bugs. Therefore corrupted or outdated firmware can also cause the red light on your router.
To solve this problem, you will need to update the firmware. Follow these steps
- Access the extender’s admin dashboard by logging in.
- Proceed to locate the Firmware update section within the System Tools menu.
- Within this section, you can perform a Local or Online firmware upgrade, depending on the available options provided by the extender.
Watch this video if you have a problem updating firmware:
Fix 4: Fixing the Settings
Sometimes, connectivity problems with your TP-Link Wi-Fi extender can occur due to incorrect settings on the device.
Therefore, ensuring the extender’s configuration settings are accurate is essential to establish a successful connection.
Take a moment to double-check the settings, such as the network name (SSID) and password, and verify that they match the main router’s settings.
Both devices must use the same network credentials, allowing for seamless connectivity and a smooth Wi-Fi experience.
Fix 5: Troubleshooting the Main Router
When the main Wi-Fi router encounters issues, it can lead to the TP-Link Wi-Fi extender not functioning correctly, resulting in a red light indication. This occurs particularly when no active internet connection is available from the main router.
To troubleshoot this problem, check the main router’s internet cable, connector, and power cord for any potential issues. Ensure they are securely connected and functioning correctly. If any problems are detected, address and fix them accordingly.
Additionally, it is important to review the settings of the main Wi-Fi router, as they can sometimes cause problems in establishing a connection with the TP-Link Wi-Fi extender.
Fix 6: Check TP-Link Device for Failure
Sometimes, if the TP-Link Wi-Fi extender has a red blinking light, it might mean that there’s something wrong with the device itself, like a hardware problem.
If the solutions we discussed earlier don’t fix the issue, it’s a good idea to contact TP-Link support for more help.
They can give you specific instructions for your extender model or determine if you need a replacement.
If your extender is still under warranty, TP-Link support might be able to offer repairs or give you a new unit. But if the warranty has expired or the problem persists even after trying everything, you might have to consider buying a new extender.